
Data collection anomalies happen and they can take a variety of shapes—from not collecting any data, through collecting spotty data, to over-counting data.
Data analytics solutions downstream of such problems have developed various damage control measures. Adobe's Virtual Report Suites unlock valuable capabilities for "cleaning up" processed data, but in many cases there is no data to clean up!
In this post we'll address the specific issue of lapses in data collection and present three different techniques for backfilling historical data in Adobe Analytics.
When is Injecting Historical Data an Option?
Some common scenarios leading to data collection lapses include:
- A set of marketing landing pages went out, but they were not tagged.
- A new sign-up flow on your Native Application resulted in New Accounts to be no longer tracked.
- Your shopping cart was streamlined, but tagging errors resulted in no purchases being collected.
You can probably recount your own painful memories of similar data collection mishaps. And once you've been bruised by the flat line on a trend chart, you usually remember pretty quickly that there are other data sources you can use to backfill Adobe reports. A list corresponding to the examples above may look like this:
- The Apache or IIS logs that were recorded on the web server(s) hosting the landing pages.
- A transactional database that keeps a list of user accounts that get created on the Native App.
- A backend system that stores and processes online orders.
Getting this data into Adobe Analytics would invariably require a set of transformations regardless of the path you chose to pursue, but if you have such an alternate source and if continuity of conversion data in AA is sufficiently important, the explosion of new work is worthwhile. Here are some common challenges of data preparation and backfilling to consider:
HTTP requests/tagging using s.timestamp
The majority of data analyzed by Adobe Analytics is collected through the standard JavaScript tracking libraries (AppMeasurement.js, s_code.js, etc). These libraries trigger HTTP requests that can be inspected in a variety of tools, including the browser network tab. Below is a screenshot of one such request with the t parameter highlighted: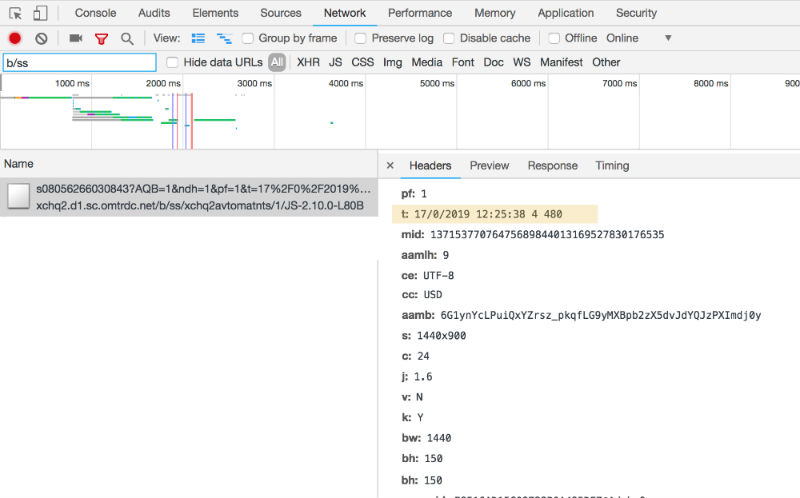
You can try playing with the t parameter, setting it to various minutes/hours/days/months/years in the past and reissuing the same request, but that won't have the intended effect. Any requests to the Adobe collection servers that you generate will be timestamped at the time it is received and so activity will not end up in the right time period in reports.
Adobe offers another parameter, s.timestamp, that allows you to set the time in your client-side code. For example:
s.timestamp='2019-01-16T19:45:01-05';
would result in the following HTTP request (in addition to the t parameter, the request now contains the ts parameter):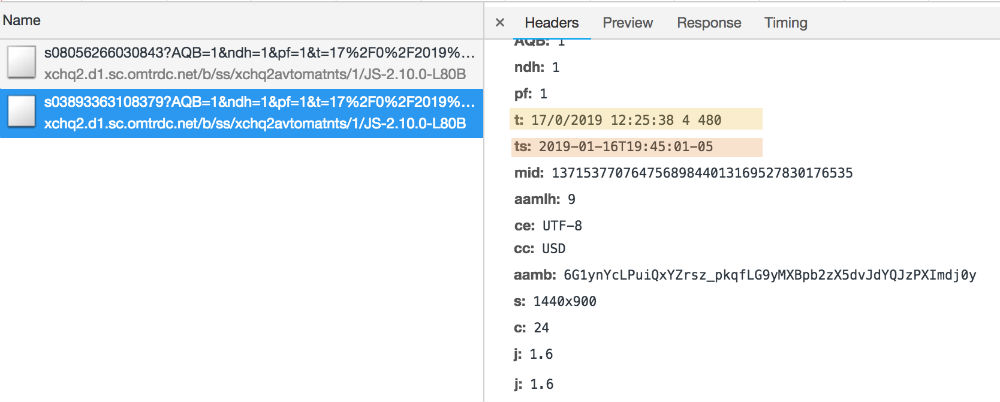
This looks promising, except that the default setting for Adobe report suites is for such requests to be discarded. This behavior can be changed for individual report suites by changing the timestamp setting to "timestamp optional". Note that changing your report suite's timestamp configuration has a number of consequences, so this should be done only after careful consideration.
Once "timestamp optional" has been enabled, requests containing the ts parameter would be processed by Adobe as if they took place at the time set in s.timestamp. In the example above, the s.timestamp value is for a recent day in the past, January 16th. In the tests we ran, this data was correctly "stitched"—it appeared in the right place within the sequence of individual hits and was attributed to the correct session and visitorID.
Adobe Data Sources
The Adobe Data Source feature offers a trove of capabilities for adding data to your report suite retroactively. We used the Full Processing option, which was ideal for a project that required the insertion of several hundred thousand conversion events associated with a particular marketing channel. (The events were initially not collected because of a tagging issue, but a backend system contained data that could be transformed and sent to Adobe.)
Using Full Processing involves three main steps:
- Creating and activating the data source using the wizard setup under Admin >> Data Sources >> Create. At the end of the setup process you can download a sample file to use as the template for the log entries you want processed and the information for an FTP server that you would use to upload your log file.
- Generating the log file. Using the template you downloaded in step #1, you populate it with the data you want inserted. In our case, we wanted to increment event1 for a set of authenticated users for which we had backend data based on the user id.
- Uploading the log file and verifying the data is populated.
Here's a snapshot of the log file that was created in step 2:

The upload process will correctly increment success events against the pageName/props/eVars you outline in the file.
A few items to keep in mind—there are limitations relating to the number of records you can associate with a single visitorID and also limits on the size of any given file. If you don't observe these limits, even if you provided existing visitorIDs, the excessive data will not get merged into previously analyzed or uploaded data.
Adobe Data Insertion API
The Adobe Insertion API also allows you to retroactively inject data into your Adobe Analytics report suites. If you haven't used the Adobe Data Insertion API, this GitHub resource provides a great walkthrough.
Using the API together with Postman can allow you to quickly prototype and test the types of data you want inserted before scripting a solution that requires more than a few dozen records. Below is an example of a request composed via Postman:
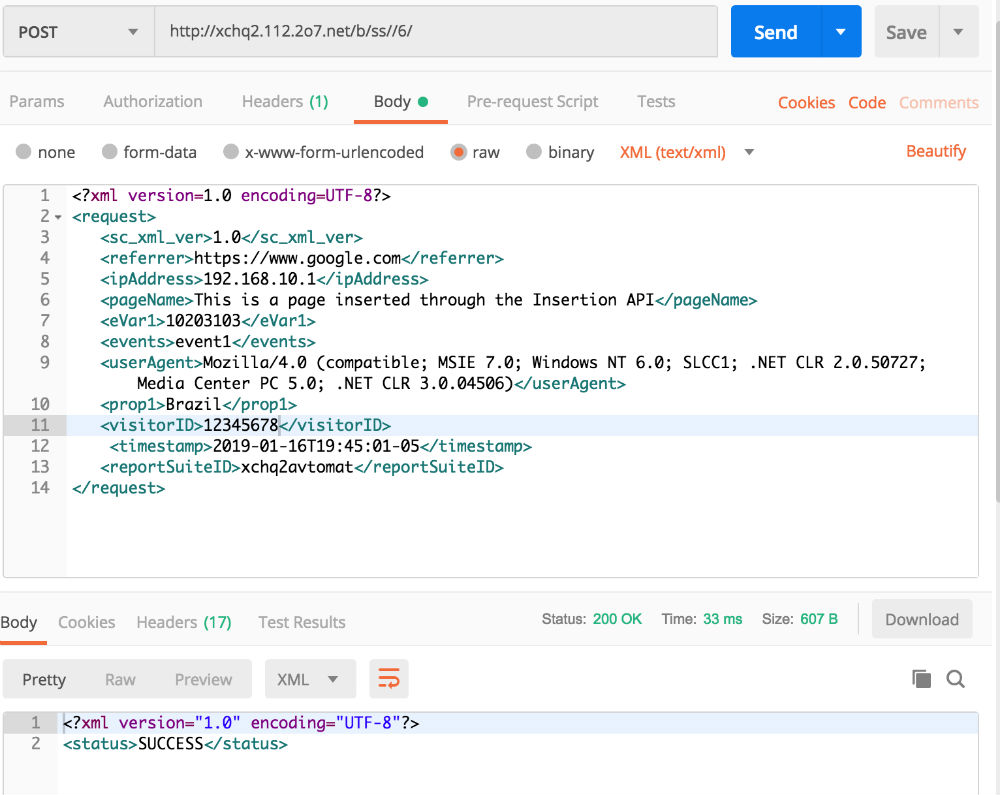
While setting up the XML is fairly straightforward, one thing to watch out for is the <userAgent> field. If left blank, the data will be collected and processed by Adobe, but it will go into your Bots report, so be sure to set a valid User Agent.
Miscellaneous Tips / Lessons Learned
- Configuring and using Real Time reports feature can save you a lot of time when trying to test anything that has to do with data collection.
- This goes for any testing, but especially for cases where you are working with changes to the timestamp settings of a report suite and/or inserting historical data, it makes sense to first use a set of Dev/QA report suites to check your work before sending the data to the production report suite(s).
- Adobe provides some rough guidelines on when you can expect the data you inject to show, but these are just estimates. To make sure all of your data has been processed, it makes sense to issue two extra requests. The first request is issued immediately before you begin sending the historical data and the second is issued right after you have finished the process (if using Data Sources, set an extra line in the beginning and end of your log file). In these additional requests, you can pick one of the variables (easiest one is pageName) and you set it to "API Inject Start" and "API Inject Complete". Once you see both values in your reports, you know for sure that all the data you have sent has been processed.
Tags: Data Quality Adobe Analytics Tips